5/30/08

Removing Sample Company Date Message in Microsoft Dynamics GP v10


This one comes courtesy of Leslie Vail, directly from the Microsoft Dynamics GP Technical Airlift, held in Fargo, North Dakota from May 28 - May 29.
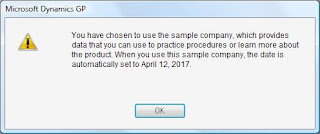
How many times you wish you could vanish that annoying sample companany date message box? How many times you could set the user date to something else when login in? The answers are all here now! You are looking at a few new Dex.ini settings that allow you to do just that!


Edit the dex.ini file and include one of the following:


SampleDateMsg=FALSE, will prevent the dialog box from being displayed while leaving the date as April 12, 2017


SampleDateMMDDYYYY=00000000, will prevent the dialog box from being displayed and to use the current system date.


SampleDateMMDDYYYY=MMDDYYYY, will prevent the dialog box from being displayed and to use a user-specified date (replace the placeholder MMDDYYYY with the month, day, and year. For example, May 15, 2015 would be: SAMPLEDATEMMDDYYYY=05152015)

5/26/08

Deleting Unit of Measure items and Pricing

I had a situation today where we have items that have inaccurate unit conversions (ie. we need to modify some as well as delete some). To complicate matter more, we have some open orders as well as invoices from orders that used the old UofM for pricing.
Well much to my surprise i found out a few things while testing in an test company.

Deleting a UoM Line or Conversion
  • Go to Cards > Inventory > Items.
  • Click on the U of M Schedule ID
  • Click on a line you want to delete
  • Go to Edit > Delete Row (Alt,E,D)
If you have orders that are open or invoices that have not been posted, they will be fine. It appears that the order contains the converstion and is not dependent on the schedule after creation. However, the line you deleted will not be available any longer.

To change/modify a UoM take the same approach ans just change the ration to Base UoM. this will not alter any existing open orders or previouosly invoiced items.

5/7/08

Suppressing Voided Documents from Customer Statements

Suppressing Voided Documents from Customer Statements
Microsoft Dynamics GP is a feature-rich product with the ability to include and exclude a good amount of information via the user interface, but when it comes to simple practical aspects such as suppressing voided documents from a customer statement, well it kind of falls short. No worries though! This article presents detail steps on how to suppress voided documents on customer statements without involving any programming.

For this example, I will be using the RM Statement Long Form (any statement will do) and will devide the process into 2 phases. So, lets get started.

Phase I - Setup the new relationships to expose the Void Status field

Since the document void status cannot be obtained from the current tables in the relationship, it will be necessary to create a relationship to the RM Open table.

1) Print the statement you would like to modify to screen and hit CTRL + F9 on your keyboard. Close ALL opened windows once in Report Writer.

2) Click the Tables button on the toolbar and select Tables from the drop-down button menu. This will open the Tables window.

3) Locate the RM_Statements_TRX_TEMP table, click Open to open the Table Definition window.

4) Click on the Relationships button to open the Table Relationships window. Click on the New button to open the Table Relationships Definition window.

5) Click the ellipses button, next to the Secondary Table field to open the Relationships Lookup window. Locate the RM Open table, highlight and click Ok.

6) Back to the Table Relationships Definition window, click on the Secondary Table Key drop-down and select RM_OPEN_Key1

7) Match each drop-down key segment on the left with the grayed out key segment on the right. You should find and EXACT MATCH for each field (this should create a One-to-One relationship between the tables) as shown below. When finished, click Ok to close the Table Relationships Definition window.


8) Close the Table Relationships window

9) Click Ok to close and save the Table Definitions window.

10) Close the Tables window


Phase II - Suppress the field on the report

Now that we have created the table relationships, we will setup a calculated field to check on the Void Status field of the RM Open table to decide whether the record will be included in the body of the statement report. For this, we will use the "Suppress When Field is Empty" feature in the Report Section option, in tandem with the calculated field.

1) Click on the Reports button on the toolbar. This will open the Report Writer window.

2) Select the statement report from the Modified Reports column on the right and click the Open button to open the Report Definition window.

3) Click the Layout button to open the Report Layout window.

4) Select calculated fields from the drop-down in the Toolbar window (usually at the left of the screen)

5) Setup a Conditional calculated field called (C) Suppress Voids that returns an Integer value.

6) Setup the following 3 expressions, as shown below for the calculated field.


7) Hit Ok to save

8) Click on the Layout window again and this time select Tools from the menu. Click on Section Options

9) Click on "Suppress When Field Is Empty" checkbox beneath the Body checkbox and select the calculated field created in steps 5 and 6.

10) Close the Layout Window and click Save when prompted to. Click Ok in the Report Definition window.

Return to GP and grant security to the modified report accordingly with the release of GP you are using. This should take care of everything.

NOTE: THIS WILL ONLY WORK FOR TRANSACTIONS THAT HAVE NOT BEEN MOVED TO HISTORY WITH THE PAID TRANSACTION REMOVAL PROCESS.
5/6/08

Dex.ini Settings

Some of the deep technical stuff seems to have struck a chord so we'll do a little more. This week we're looking at some of the settings in the Dex.ini file. This file holds a number of key GP settings. Many of them are available via the program interface but some are not. This is NOT intended to be a comprehensive list of every possible Dex.ini line. But if you think I missed something, add it to the comments and we'll build a full list together.
SuppressChangeDateDialog=TRUE - Turns off the Date Change dialogue that opens at midnight
Synchronize = TRUE - Forces a synchronization of the chart of accounts format
OLEPath=\\server\folder\ole - Sets the path for linked and embedded files. This is often set up inconsistently in the initial setup. You'll need to include your path in place of \\server\folder\ole
NoPrintDialogs=TRUE - Suppress the print dialogue box
ShowResids=TRUE - Make resource ID's visible in Dexterity
SQLLogSQLStmt=TRUE SQLLogODBCMessages=TRUE SQLLogAllODBCMessages=TRUE - Turn on Dex SQL Logging (all 3 lines)
ShowAdvancedMacroMenu=TRUE - Turn on the Advanced Macro Menu
C:\DPS1\DEX.INI DPSInstance=1 C:\DPS2\DEX.INI DPSInstance=2 C:\DPS3\DEX.INI DPSInstance=3 - Run multiple process servers on a single machine. Specifics on CustomerSource here. (One line for each process server)
AutoInstallChunks=TRUE - Add CNK files without the "Add New Code?" dialogue
ExportOneLineBody=TRUE - eliminate line wrapping when exporting reports to comma or tab delimited files.
IMPath=C:\Program Files\Microsoft\Great Plains\Integration Manager\IM.EXE IMExecPath=C:\Program Files\Microsoft\Great Plains\Integration Manager\IMRun.EXE - Set the path to Integration Manager so it will launch properly from the menu. (2 lines)
WindowMax=TRUE - Open the GP main window full screen

5/1/08

Customers who have not bought a particular item

SELECT CUSTNMBR
FROM dbo.RM00101 r
WHERE (CUSTNMBR NOT IN (SELECT DISTINCT custnmbr
FROM sop30200 h JOIN
sop30300 l ON l.sopnumbe = h.sopnumbe AND h.soptype = l.soptype
WHERE itemnmbr LIKE 'DGHB'))